Building a website is no easy feat. If you aren’t tech-savvy, it can seem impossible.
Trust us — it’s not.
It doesn’t have to be difficult to show off your restaurant in the online world. This is especially true if you partner with a great web hosting provider.
This is why, today, we’ll show you how to make a restaurant website with BlueHost - a reliable hosting provider that offers you so much.
So let’s get started!
Video Tutorial: The Most Efficient Way to Make a Website with BlueHost
If you are more of a visual learner, we’ve made a video that includes all the steps included in this article.
This is for an Affiliate Site. However, you can use it to create a restaurant website as we use BlueHost here, too.
How to Make a Restaurant Website in 5 Steps
Here are the 5 steps to making a restaurant website:
- (Meal) plan your website
- Get a domain and hosting service
- Set up WordPress
- Customize your website
- Go (bar) nuts
Now, let’s look at each step one by one.
How to Make a Restaurant Website Step #1: (Meal) Plan Your Website
Yes, that was a pun. That’s to give you an idea of how to play around with words on your site.
Also, remember to build a visual representation of your restaurant and a platform for customers to go for answers.
That said, don’t forget to plan out these important components of your website:
Location/s: Where Are You
Customers need to know if you are within reach or somewhere they want to go. Indicating your restaurant’s location also helps customers integrate you into their plans.
Suppose they are from somewhere else and planning a trip to your area. When they know your restaurant is within their destination, they just might visit to give your restaurant a try.
Remember to add all locations, if you have many. This way, if they did find you while traveling, they can look up a branch that’s nearest to them.
What’s more, setting your location/s helps optimize location-based SEO. Geo-targeting helps your site show up on search engine ‘result pages’ when customers run a quick search for “restaurants in my area,” “restaurant open at xx time,” or “xx cuisine in xx city.”
Contact: Hotline, Email, WebChat for Customer Service
Let’s break down what customers are receptive to the most.
Recent studies show that more and more people prefer written correspondence over speaking with a representative over the phone.
Add your email, cell phone number, landline, or even a live chat box for immediate correspondence. Even better, make it a call to action button, such as:
Book a Table
Contact Us
Inquiries
Group Reservations
Service Pages: The Essence of Your Site
Your service page should allow customers an insight into your restaurant. Who you are, what you are serving, where do people find you, and how much is your food going to cost them?
Appointments: Optional but Gets You PLUS Points
Appointment buttons are specifically Contact Us for visits in the future.
A small button that helps make booking reservations with your restaurant more convenient can be a catalyst for landing new customers. We like our convenience.
How to Make a Restaurant Website Step #2: Get a Domain and Hosting Service
Now that you have an idea of what you want in your restaurant website, it’s time to get started.
First off, you need a domain name and a hosting service.
Of course, there are thousands of great hosting services out there. But for this article, we’ll be using BlueHost, one of the leading hosts with affordable prices and great services.
Also, BlueHost offers a free domain for a whole year! However, if you want to get a domain from a different service, you can set up one with Domain.com.
Pick a catchy domain name
Here are some tips to consider when choosing your domain name:
- Incorporate your restaurant’s name as much as possible. If you’re lucky, your name hasn't been taken yet.
- Keep it short and simple. 10-12 characters are best.
- Use keywords. If your name is taken, substitute it with words most relevant to your restaurant or its name.
If you don’t have any ideas, BlueHost gives you name suggestions that you can go for instead.
Getting Started with BlueHost
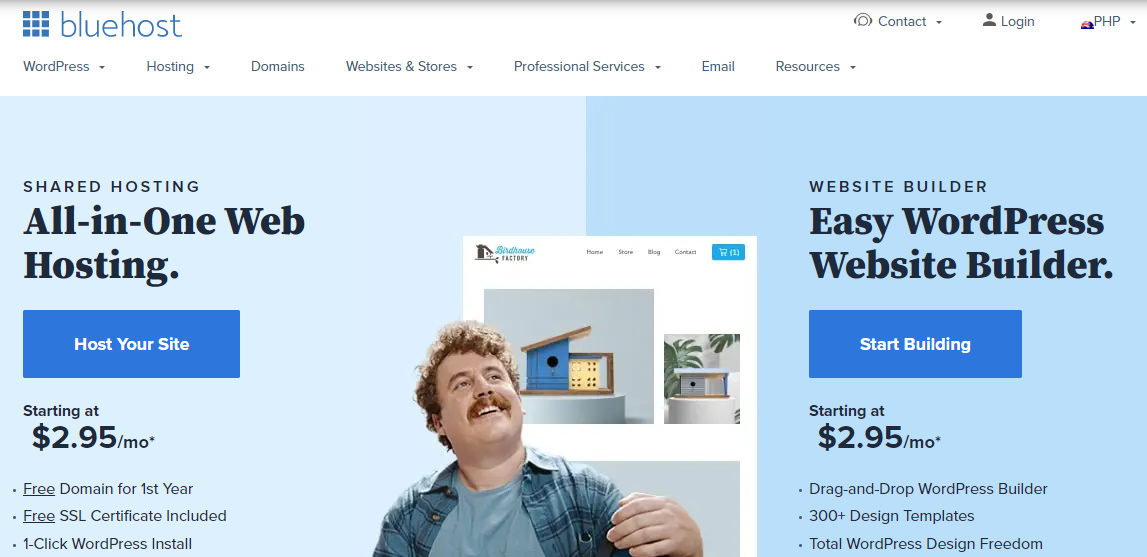
Visit the BlueHost website at BlueHost.com.
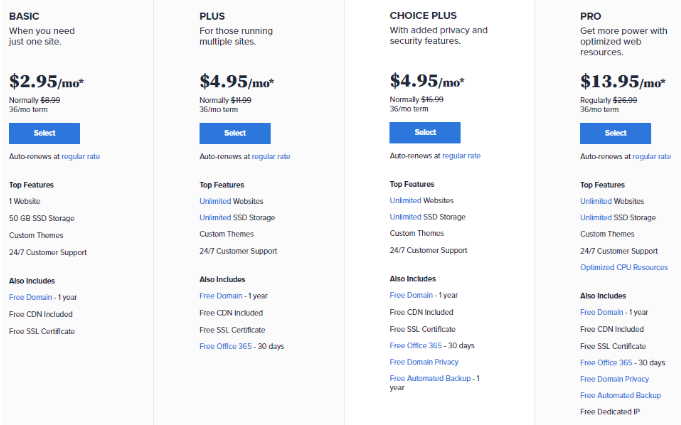
Click Host Your Site to get BlueHost’s packages and prices.
If you’re new, you can start with the BASIC package. This already offers a ton of what you need to get started.
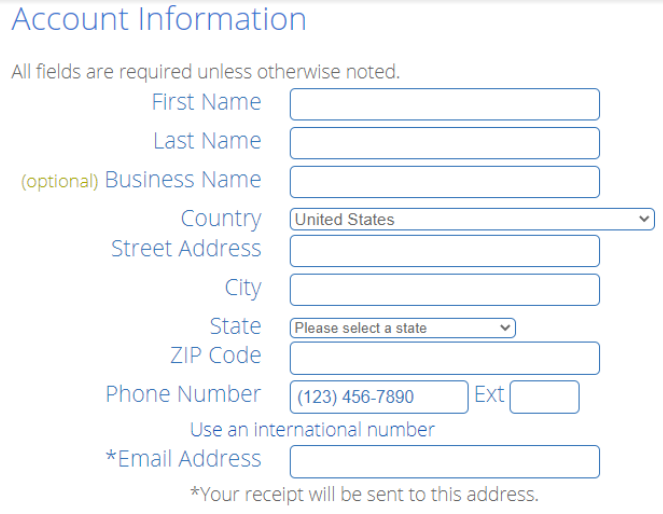
After selecting a package, fill out the Account Information sheet. Here, you will fill in the blanks about your personal information.
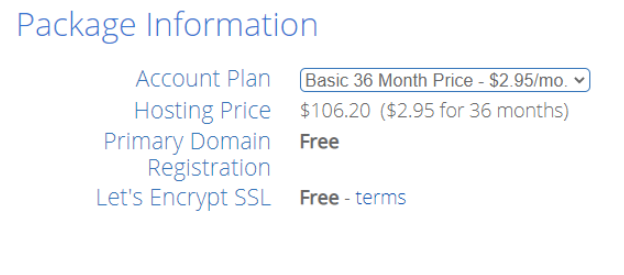
Then, you can either confirm your selection or change your Account Plans. There are four choices: 1 month, 12 months, 24 months, or 36 months. You will see each plan’s most significant features.
You can also choose Package Extras to add any feature you may need. If you aren’t interested in adding any extras to your packaged plan, skip to the Payment Information section.
If you are interested, then here are some extras you can include:
Domain + Privacy Protection - We suggest you spring a few extra dollars on this feature for safety purposes.
Without this BlueHost added security feature, anyone can look up details about your domain. Who owns it, who runs it, and other information you want to be hidden from spammers, hackers, and even competitors.
Codeguard Basic - Websites crash. With this feature, you can restore all your files to their proper places with a click of a button.
The one-step restoration of your site is thanks to its daily automated backup system that’s implemented on your website’s files.
Bluehost SEO Tools Start - unlike the first two, this feature isn’t geared toward security. These SEO tools are to help your website’s growth in the online world.
Bluehost uses dynamic SEO techniques to advance your site’s reach, as well as give you insight into your website’s developments. With SEO reports provided, you can understand what you need to integrate into your website and what you have on it that isn’t helping.
Plus, this extra is pretty cheap for what you’re getting. It’s a cost-effective feature that prioritizes your website’s future.
Single Domain SSL (Single Domain Secure Socket Layer) - If you aren’t interested in the first two security extras above, you might want to consider SSL.
SSL certificates protect your customer’s sensitive information like contact information and payment details. Websites with SSL are ranked higher by search engines.
It’s great for your SEO and your customers. It’s a small price to pay for such a win-win feature. However, bear in mind that this is on top of your package’s FREE Let’s Encrypt SSL, which protects communications between clients, websites, and servers.
However, if your website offers payment plans of any sort, the Single Domain SSL extra is worth it.
So pick any extras that you want or need for your restaurant website.
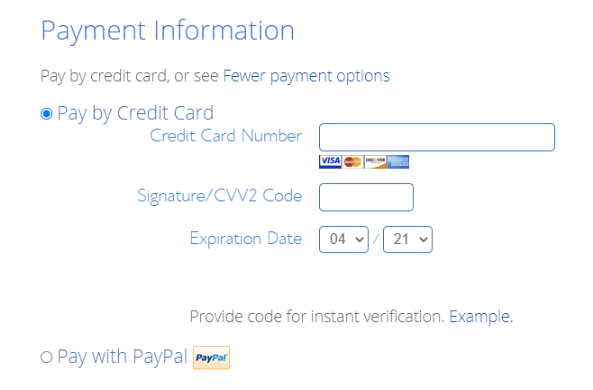
Now, it’s time to pay for BlueHost’s services!
It’s affordable plus, you can opt to pay for BlueHost’s valuable services through a debit card, credit card, or PayPal. BlueHost also offers decent refund policies.
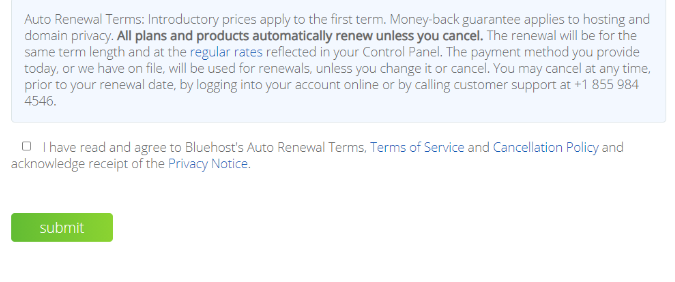
BlueHost offers users a 30-Day Money-Back Guarantee. They will refund you for its hosting services but not for domain registration.
After inputting your payment details, BlueHost’s Terms of Services Agreement will show up.
You can go about checking the box, submitting your forms, and beginning your partnership with BlueHost.
You are now in the capable hands of BlueHost. You can now start creating your restaurant website.
How to Make a Restaurant Website Step #3: Set Up WordPress
WordPress is a content management system that helps you build your website from scratch. They are strongly affiliated with BlueHost.
Now, WordPress isn’t hard to manage, especially if you follow the BlueHost process.
How to Use WordPress with BlueHost
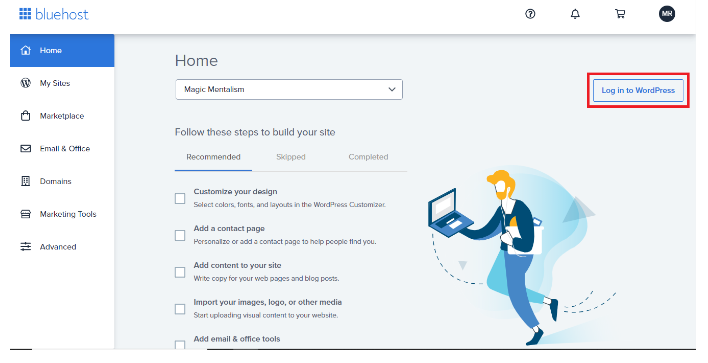
Check your email to set up your BlueHost account. Here, you can familiarize yourself with its dashboard.
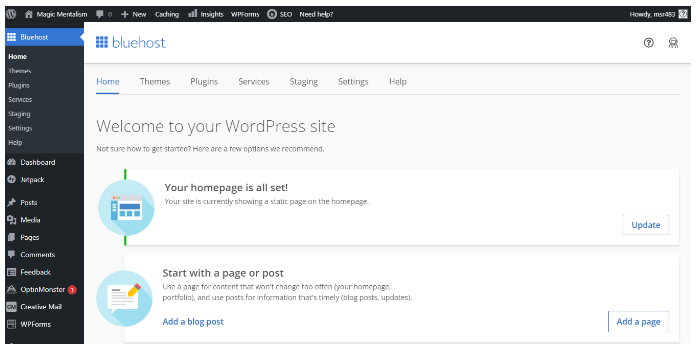
Next, launch your BlueHost dashboard and log in to WordPress.
Inside, you will find the WordPress dashboard. Don’t worry, its interface is very user-friendly.
Awesome! You have access to all the tools and techniques in its arsenal. Explore its different offerings and what you want to incorporate into your site.
When you have explored all its offerings, you can move on to the next step.
How to Make a Restaurant Website Step #4: Customize Your Website
Is your “brand” monochromatic? Colorful? Minimalist? Luxurious? This is where you create a vibe for your customers to absorb and understand what you are about. Get creative with it.
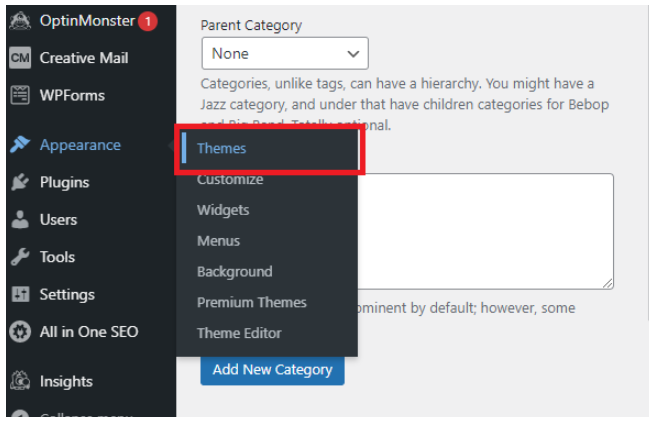
Launch the BlueHost dashboard and hover over Appearance. Then, select Themes on the window that appears on the right.
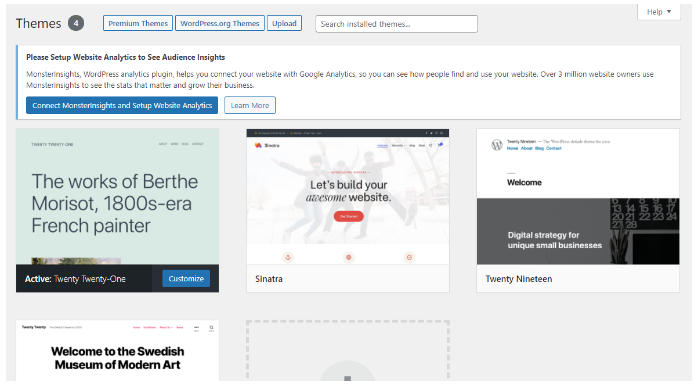
You will see various themes and templates you can choose from, like the current default WordPress theme: Twenty-Twenty-One.
You can pick a theme to serve as the skeletal framing and work your magic to make them unique to your restaurant’s style.
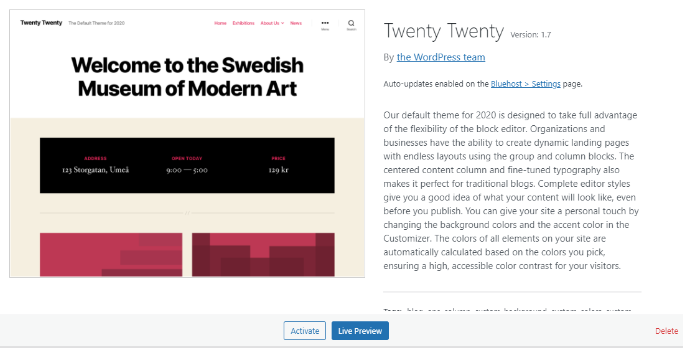
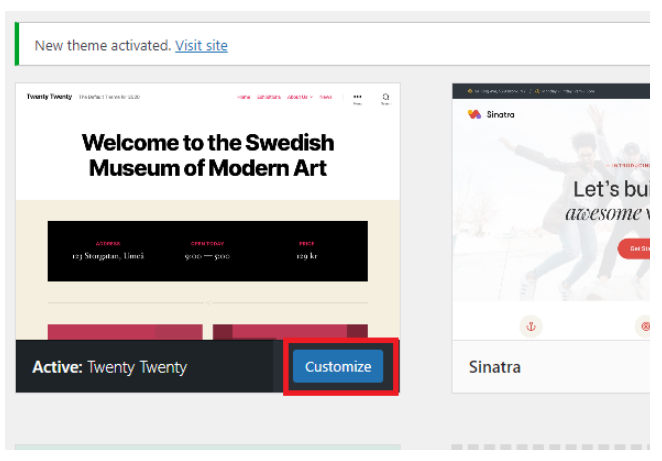
Click on Activate to set the theme. Below you will find a Customize button. Click on it to play around with its designs.
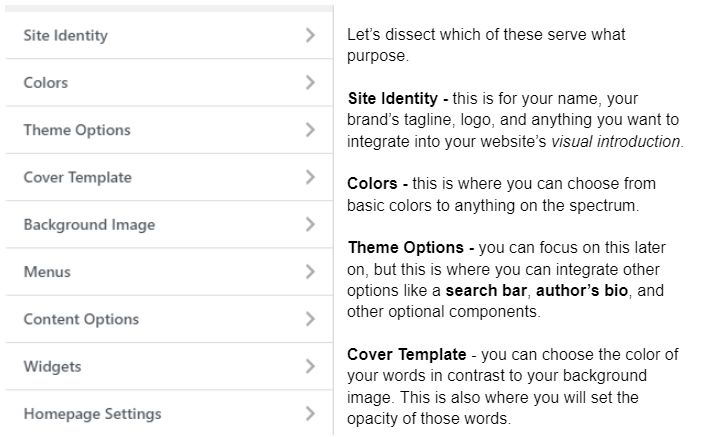
You will then prompt this window below.
Let’s dissect which of these serve what purpose.
Site Identity - this is for your name, your brand’s tagline, logo, and anything you want to integrate into your website’s visual introduction.
Colors - this is where you can choose from basic colors to anything on the spectrum.
Theme Options - you can focus on this later on, but this is where you can integrate other options like a search bar, author’s bio, and other optional components.
Cover Template - you can choose the color of your words in contrast to your background image. This is also where you will set the opacity of those words.
Background Image - this is where you can upload files to serve as your website’s background image. It is optional but helps establish your brand’s image.
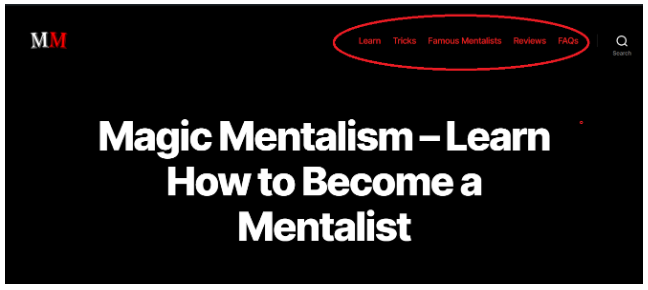
Menu - is an important component in building your website. Don’t confuse this with your website’s “pages.” While it is related to your site’s pages, the menu serves as action buttons that help visitors navigate websites.
You will decide how it looks, where it sits on your page, and what it will contain. This is a determining factor of your website’s interface.
Content Options - this is responsible for footnote details on your website, like authors of posts, photographers of pictures, dates, and subtitles of what people see on your website.
Widgets - this is traditionally found below. They are linked to other off-page landing pages, such as your social media or privacy policy. It’s not all too important now, and you don’t need to prioritize this.
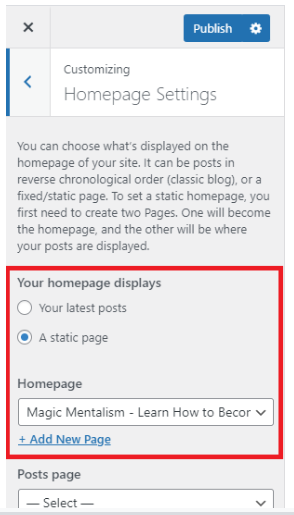
Homepage Settings - this is the most crucial option to customize. You will have to set it right away.
This page will have to be set to “static page” mode. Click on the dropdown menu and select the page you want as your homepage.
Whatever your website’s aesthetic delivers to visitors online will be how your customers perceive you.
Deliver your restaurant through colors, functions, words, and pictures.
Remember to add pages and categories into the mix, so your website’s visitors can easily navigate your site.
Pages
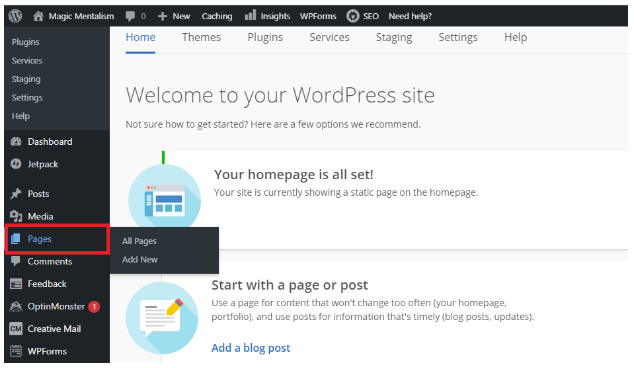
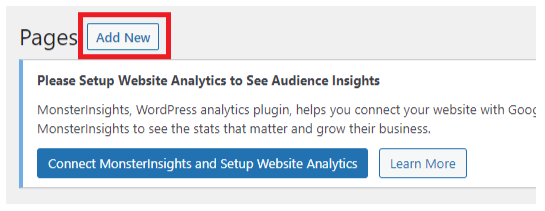
First, click on Pages on the options column on the left of your WordPress dashboard.
You can see all your current pages that are up on your site. You will also see the Add New option.
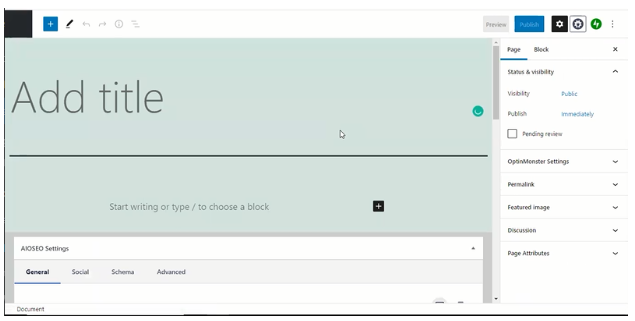
Right now, all you need to do is add a title for each page and hit publish on the top right-hand corner of your screen. We’ll get to designing each one of those pages later.
Remember to add a Homepage in there that will serve as your website’s anchor page. The default is typically just a boring old list of your latest posts and additions. YAWN.
The following pages you create should be what customers look for on websites. Here are some sample pages we’ve seen from restaurant websites.
Home > About > History > Contact > Reservations > Reviews > FAQ > Store Locator
You can choose your own or play around with these templates.
Categories
Next, you can set up your website’s Categories.
This is more for your website’s organization than anything else. It’s how you delegate where all your materials should go within your website.
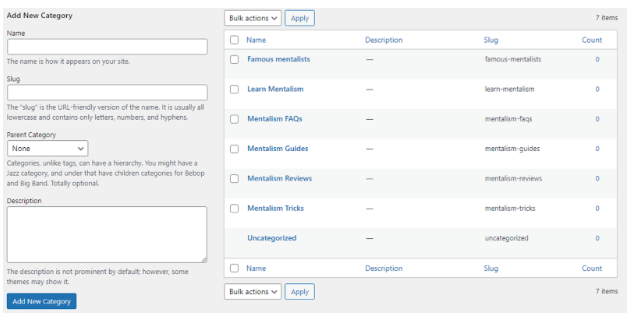
On the Bluehost dashboard, hover over Posts, and when another window shows up, you will see Categories.
Like Pages, you click on Add New to add another category.
Here, you create new categories and define which of your future additions should fall under them on this page.
How to Make a Restaurant Website Step #5: Go (Bar) Nuts!
And there you go! You have all the makings of a great website.
Make full use of WordPress’ toolbelt. There are various additions you can make to your site.
Don’t just go for the usual—step outside of the box. In our research for this article, we’ve seen some unique ideas that make things jump off the page.
When it comes to creating your homepage, design it with bravado. In social media terms, this is your restaurant’s profile picture.
Conclusion
And that was how to make a restaurant website in 5 steps.
Phew! What a ride.
But now you understand the different components of creating a website.
It’s a lot! But it isn’t too much for your business.
Remember, it’s always best to entrust your online presence with a reliable partner. You can look for other hosting programs out there, and there are many to choose from, but BlueHost is a great start.
So what are you waiting for?
Create a website for your restaurant today and get even more customers!
Good luck!

